My apartment is now home to a fairly respectable number of electrical devices. In addition to the usual suspects such as the refrigerator, washing machine, television, and computer, there is also a NAS, a 3D printer, and a variety of other equipment. Until now, I had connected some of them to inexpensive Chinese Wi-Fi smart plugs. That generally worked. As long as the plugs happened to be in the mood.
Every now and then, they developed a remarkable degree of initiative. My computer once switched itself off while I was gaming, the television ended a binge-watching session without being asked, and the 3D printer also lost power halfway through a print. At least there was no doubt that these devices were smart, insofar as they made their own decisions. Unfortunately, they almost always made the wrong ones…
At the same time, I had been considering smart radiator thermostats for quite a while. With heating costs as high as they are, there is little point in keeping the apartment at a comfortable temperature throughout the day when nobody is home. On the other hand, I do not particularly want to spend several hours sitting in a cold apartment every evening while the radiators slowly warm up. Nevertheless, I never actually bought the thermostats. The reason was highly technical: I was afraid of unscrewing the existing thermostat heads. In my imagination, replacing them would end at the very least with a fountain of water and a soaked floor. In theory, I knew that changing a thermostat head does not open the heating circuit. In practice, a certain distrust of the whole operation remained.
A plan I had been putting off for quite some time
When one of the old Wi-Fi plugs finally terminated an active 3D print, the decision had been made. If I was going to start replacing the troublesome plugs anyway, I might as well tackle the long-postponed smart-home project at the same time. As so often happens with my projects, the transition from “I am replacing one smart plug” to “I need a central building-management system for 65 square metres of rented apartment” was pleasingly brief.
Zigbee, because data has to go somewhere
After some research, I settled on Zigbee. Unlike my previous Wi-Fi plugs, the devices do not all have to contact some cloud service on the other side of the planet individually. Zigbee is designed for low-power sensors and actuators and, something I particularly like, every mains-powered device such as a smart plug can act as a router, creating a mesh network for the other devices.
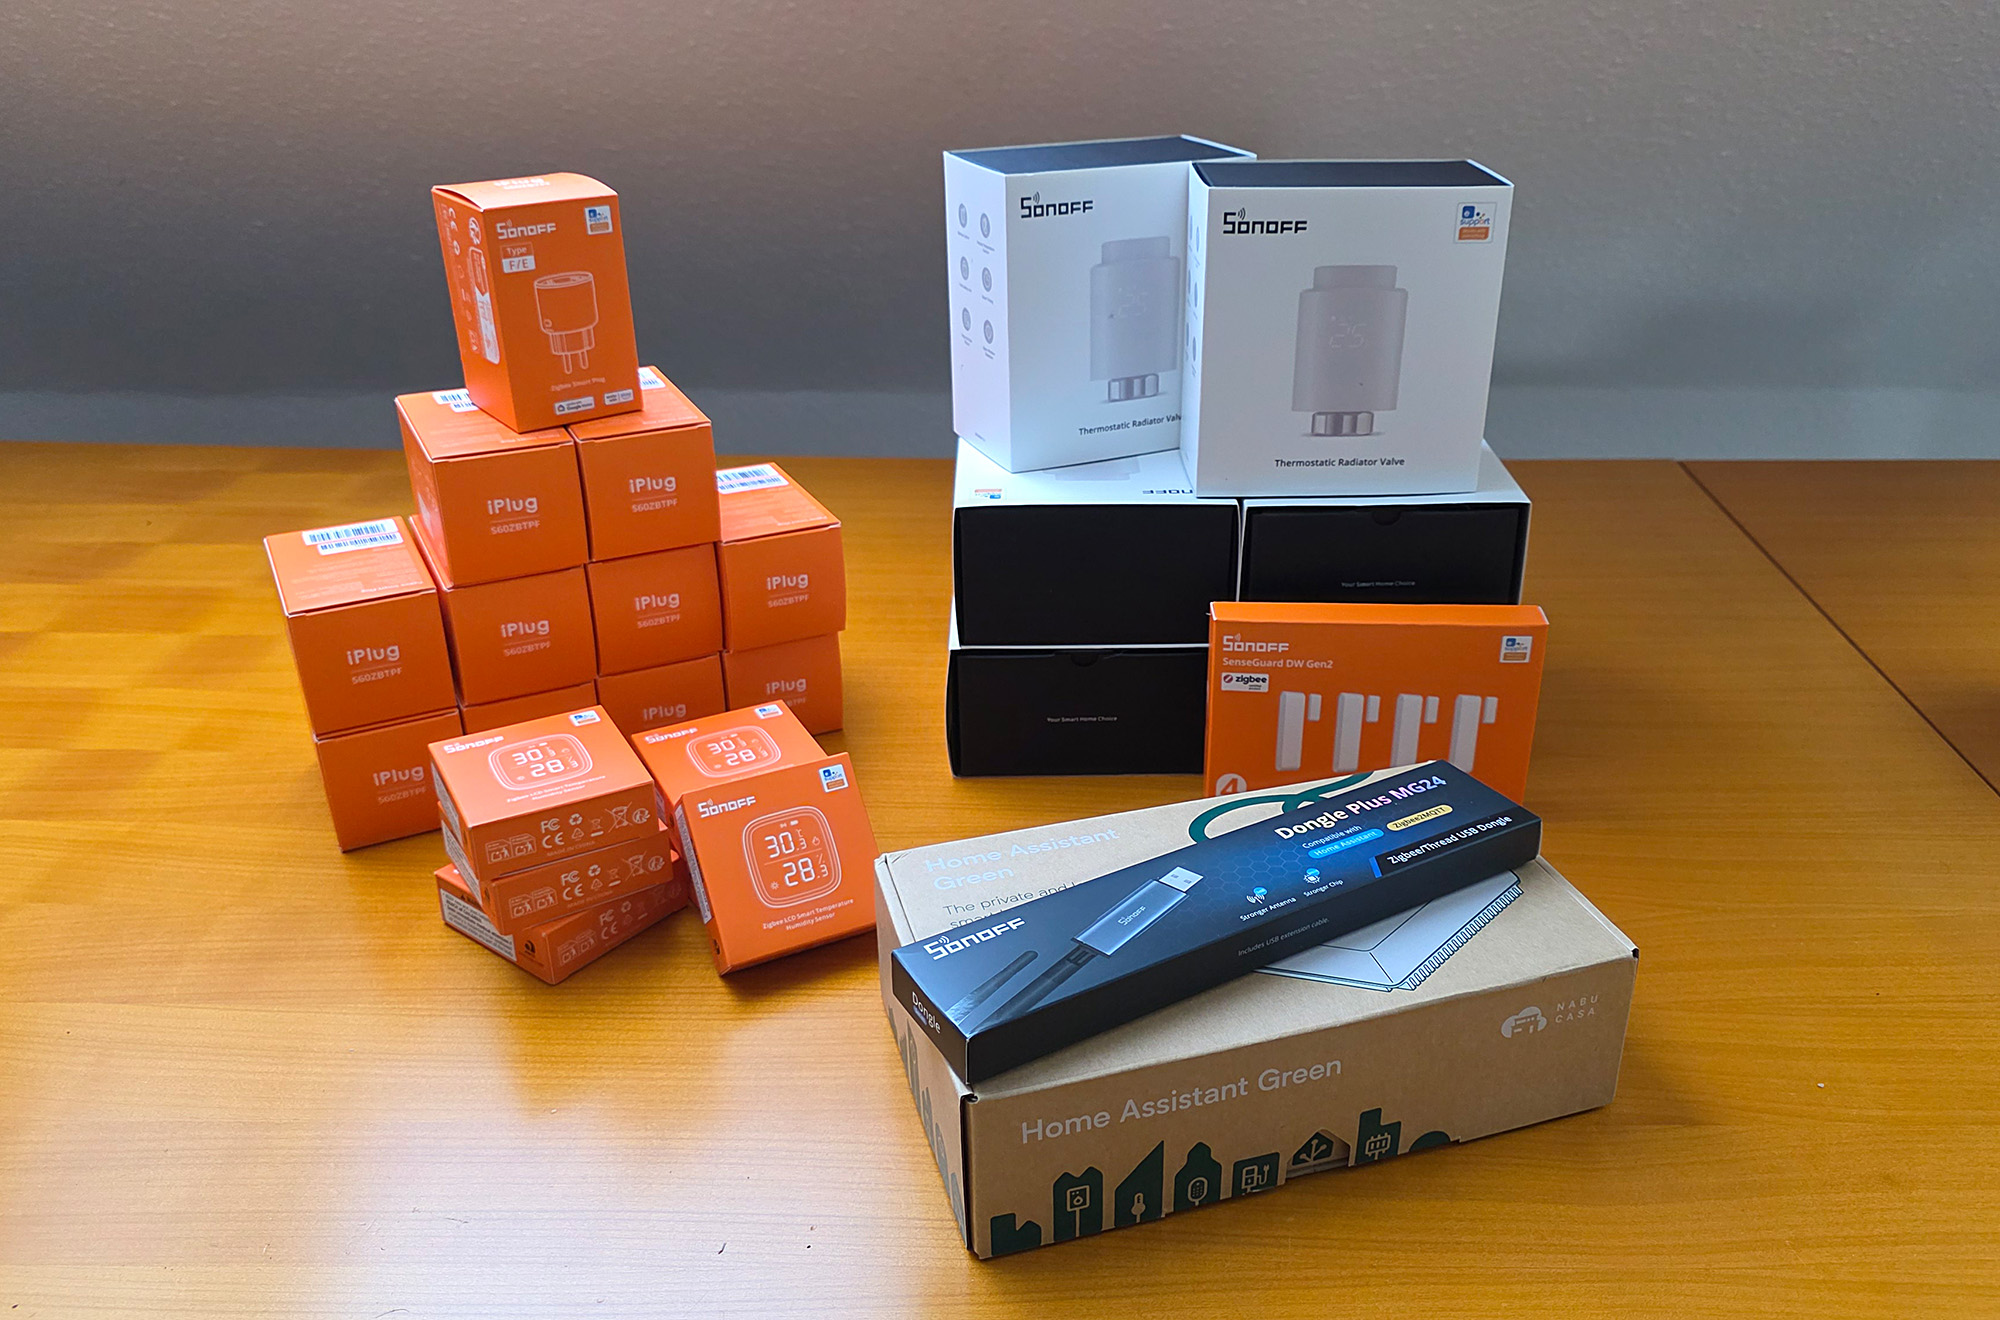
The first batch of smart-home equipment
As for the software, Zigbee2MQTT in combination with Home Assistant quickly became the obvious choice for me, as it exposes a gratifying number of device readings and settings. That suits me perfectly, because I am rather fond of meticulous smart-home micromanagement and data logging. If a temperature sensor reports not only temperature and humidity but also battery voltage and link quality, I naturally want to see all of it in some kind of chart. Whether that chart will ever produce any practically useful insight is beside the point. I ordered the devices from smartdomo.de. A Home Assistant Green serves as the central hub. The little computer is designed specifically for Home Assistant and saves me from having to administer yet another Raspberry Pi or server on a permanent basis. A SONOFF Dongle Plus MG24 connected to it acts as the Zigbee coordinator. Mosquitto serves as the MQTT broker through which the data from Zigbee2MQTT ultimately reaches Home Assistant. I also bought SONOFF S60ZBTPF smart plugs with switching and power-monitoring functions, SONOFF TRVZB thermostats for the six radiators, SNZB-02D temperature and humidity sensors, and several SenseGuard DW Gen2 sensors for the doors. The plugs not only measure current power draw and energy consumption, but also improve network coverage by acting as Zigbee routers. The room sensors, meanwhile, provide the thermostats with the actual temperature in each room. This makes considerably more sense than measuring it directly beside a hot radiator.
Surprisingly little drama during installation
The basic Home Assistant setup was remarkably straightforward: connect the Home Assistant Green, start it, open the web interface, and work through the setup wizard. Mosquitto and Zigbee2MQTT were also installed without any major drama. I paired the plugs first, as they form the backbone of the mesh network, and then added the sensors, door contacts, and thermostats.
The actual hardware installation probably took no more than one or two hours. Replacing the thermostat on the first radiator was still a little awkward. I kept a towel ready as a precaution and watched every step with the suspicion of someone expecting heating water to escape at any moment. By the second radiator, I understood the principle, and the remaining thermostats were installed within a few minutes. My years of worrying about replacing them therefore turned out to have been largely unfounded. At least that delay gave me the opportunity to install all six at once.
Once everything had been paired, Home Assistant was already able to record temperatures, humidity levels, door states, radiator activity, power draw, and energy consumption. The apartment was now functionally smart. Sensible people would probably have created a few tidy cards on a dashboard at this point and simply enjoyed the result. I, however, already had a control centre in mind. First, though, I installed firmware updates for every device. I can report that these updates via MQTT take foreeeeeeeeeeeeeeeever.
From an old floor plan to a Home Assistant floorplan
Fortunately, several years earlier, before moving in, I had already recreated and furnished the apartment in Sweet Home 3D. The old SH3D file was still sitting on the NAS, apparently waiting to be revived for an unnecessarily detailed smart-home floor plan.
After what felt like 100 years of firmware updates had passed (all right, it was one night), the old model was used to create an overview of the entire apartment and separate views of the individual rooms. In the overview, I can see temperatures, humidity levels, open doors, active devices, and the rooms currently being heated at a glance. Clicking on a room opens its detailed view. From there, I can control smart plugs and radiators or display additional readings. The overview itself, on the other hand, is deliberately kept mainly as a status display. After all, I do not want to switch off the 3D printer accidentally just because my thumb was a little too generous when tapping the floor plan on my phone. I already had the old smart plugs for that sort of thing.
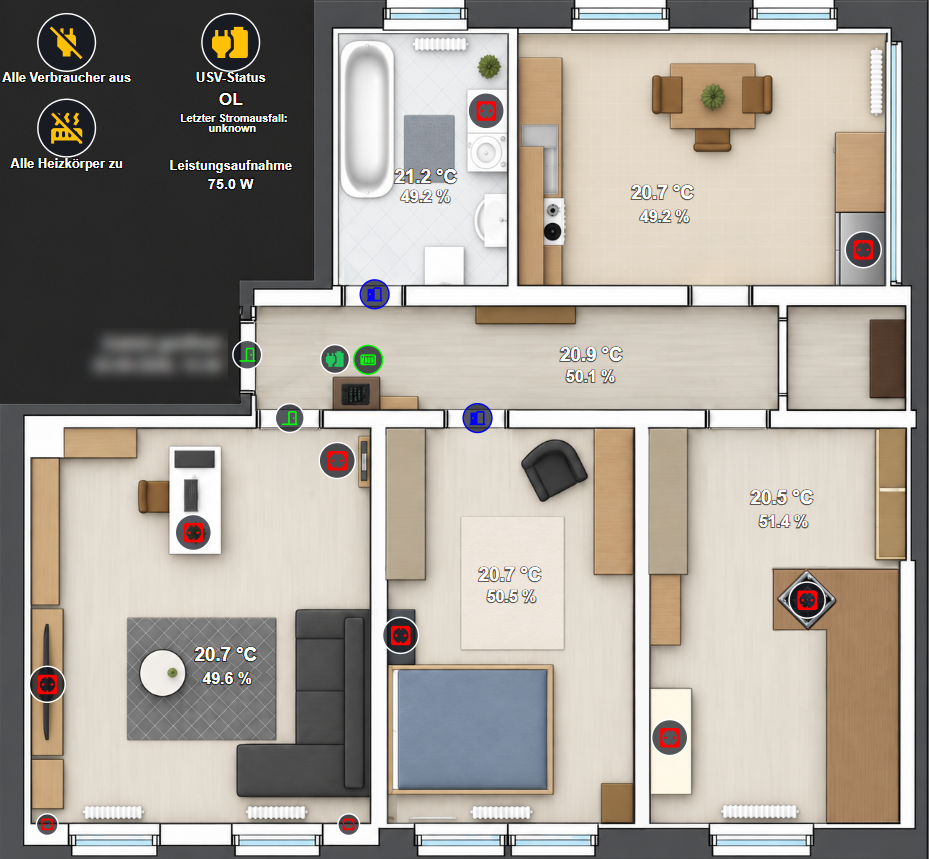
Apartment overview showing temperatures, humidity levels, door states, heating activity, and the most important devices
For the implementation, I use HACS, ha-floorplan, and Floorplan Studio. However, the current version of Floorplan Studio did not yet offer quite all the functionality I needed for what I had in mind. I therefore forked the project locally and began extending its export functionality. Among other things, my version generates dynamic text displays with units, can show or hide SVG elements depending on an entity’s state, and supports rules for state-dependent highlighting. I also added suitable default actions for displaying details and navigating between views, as well as a number of adjustments for my file structure and the full-height display. This makes it possible, for example, to show coloured overlays only when a room is actually being heated, switch door graphics according to the contact state, or display current temperature and humidity readings directly in the appropriate place within a room. In theory, all I wanted to do was add a few sensor readings to an existing floor plan. In practice, I now have my own fork of a floorplan editor. The usual course of events for one of my projects. It is also worth noting that, having been born in the Ore Mountains, I naturally prepared the controls for the Schwibbögen, our traditional illuminated Christmas arches straight away.
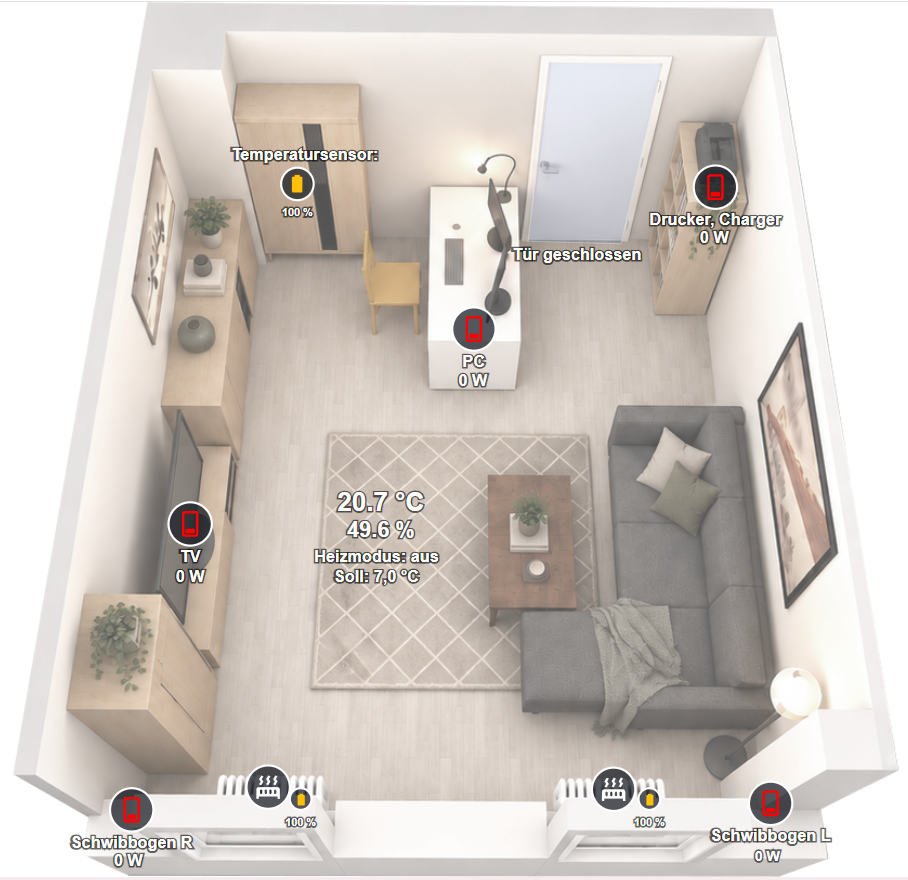
The detailed living-room view. Here, the floor plan is allowed not only to provide information, but also to switch and control devices.
One UPS, two servers, and a recalcitrant username
My technical infrastructure also includes an Eaton 3S 550 DIN UPS. In the event of a power failure, it keeps Home Assistant, the ONT, the Fritzbox, and the NAS running for at least a while. Until now, the UPS had been connected directly to my UGREEN DXP4800 Plus via USB. The NAS also acted as the NUT server and could shut itself down cleanly during longer power outages. This worked, but it had one minor conceptual flaw: my NAS does not run continuously and is only switched on when needed. Whenever the NAS disappeared, the NUT server disappeared with it. Home Assistant Green, on the other hand, runs around the clock anyway and would therefore be a much more logical place from which to monitor the UPS.
So, as an experiment, I disconnected the USB cable from the NAS and plugged it into the Home Assistant Green. The Network UPS Tools add-on recognised the UPS almost immediately. Even more pleasing was what then appeared in Home Assistant: status, battery charge, remaining runtime, current load, and various other diagnostic readings. Within minutes, a previously largely ignored box in my “server rack” (a cheap sideboard from a discount furniture store, into which the NAS, UPS, ONT, and assorted other hardware have been rather carelessly stuffed) had become yet another rich source of sensors, charts, and long-term statistics. Exactly my sort of thing. At that point, the prospect of returning the UPS to the NAS was essentially off the table.
From then on, Home Assistant was to display not only the readings, but also act as the NUT server itself. The NAS would connect over the network as a client and continue to shut itself down automatically during a prolonged power outage. In theory, this was fairly simple: run the NUT server in netserver mode, expose port 3493 on the local network, and enter Home Assistant’s fixed IP address in UGOS.
In practice, the UGREEN NAS initially failed because of something painfully trivial. Home Assistant already had a dedicated user named “nut-monitor” with a sensible password. UGOS wanted nothing to do with it and merely acknowledged the connection attempt with a singularly unhelpful error message. UGOS does not provide an option for entering a custom username. Apparently, the UGREEN implementation instead expected an additional user named nut, together with one particular and distinctly unimaginative password. The NUT add-on, quite rightly, considered this password a terrible idea and initially refused the configuration. There is, in fact, an option called “i_like_to_be_pwned: true”, which explicitly tells the add-on that you are aware of the questionable nature of your password and would nevertheless like to proceed. After creating the additional compatibility user nut with the secondary role and exposing port 3493, UGOS finally reported that it was “successfully connected”.
Since then, the UPS has remained permanently connected to the Home Assistant Green. Home Assistant collects and visualises its readings while also making them available over the network via NUT. The UGREEN NAS can still shut down automatically and cleanly if the power remains out for an extended period. A UPS that previously just did its job quietly in the background has thus become yet another fully monitored device. Whether I really need its remaining runtime as a historical chart is another question. I can plot it now, and that is what ultimately matters. To be fair, the UPS’s active-power diagnostic sensor is genuinely useful, as it saved me from having to install yet another smart plug as a power meter.
Preliminary conclusion
The main objective has been achieved: in winter, the apartment can be heated at the right times without needlessly pumping heat outside all day. The thermostats use the external room sensors, the plugs have so far switched only when I actually wanted them to, and Home Assistant brings all the devices together locally in a single interface without requiring 30 different apps.
My obsession with sensors and monitoring is also being catered for comprehensively. At practically any time, I can now see how warm and humid each room is, which radiator is currently working, how much power individual devices are drawing, and when a door was last opened. And when I am away from home, I naturally make sensible use of my newfound freedom: I sit in Home Assistant and study the humidity graph for my office.
Whether this has genuinely made the apartment more intelligent or merely given its occupant more charts remains to be seen. At least no device has switched itself off of its own accord while in use since the changeover. That will do for a start.